A Comprehensive Guide to Sitecore Headless and JSS Installation
Introduction:
Sitecore, a leading digital experience platform, offers robust solutions for building and managing complex web applications. With the rise of headless architectures and the Sitecore JavaScript Services (JSS) framework, developers can now create seamless and dynamic user experiences across various channels. This blog post will walk you through the step-by-step installation process of Sitecore Headless and JSS, enabling you to leverage the power of headless architecture for your next project.
-
Understanding Sitecore Headless and JSS
Sitecore Headless refers to the approach of decoupling the front end and back end of your web application. It allows you to deliver content and data through APIs, enabling you to create unique user experiences on various devices and platforms. Sitecore JSS is a framework that makes it easier to build dynamic, interactive applications using JavaScript and your favorite front-end technologies.
-
Prerequisites
We are not starting from scratch. We will assume you have already done the following activities:
- Installed Sitecore 10.3
- HTTP binding in IIS for your site (e.g., https://biztechsc10sitesc.dev.local; Next.js needs some coaxing to connect to an HTTPS server)
- Installed Sitecore PowerShell
- Installed Sitecore Headless Services
- Installed SXA 10.3
- Solr schemas have been populated, and indexes have been built.
- Have the latest version of Node running.
Creating Your First Headless App
In SXA, you have tenants and sites. A tenant can have many sites (or, in this case, one). In addition, configurations can be set at the tenant or site level, though most settings are going to be at the site level.
Step-by-Step Site Creation
- Right-click on Sitecore\content, and select Insert/Headless Tenant.

- Our tenant name is BizTechDemo, and we select all the modules.
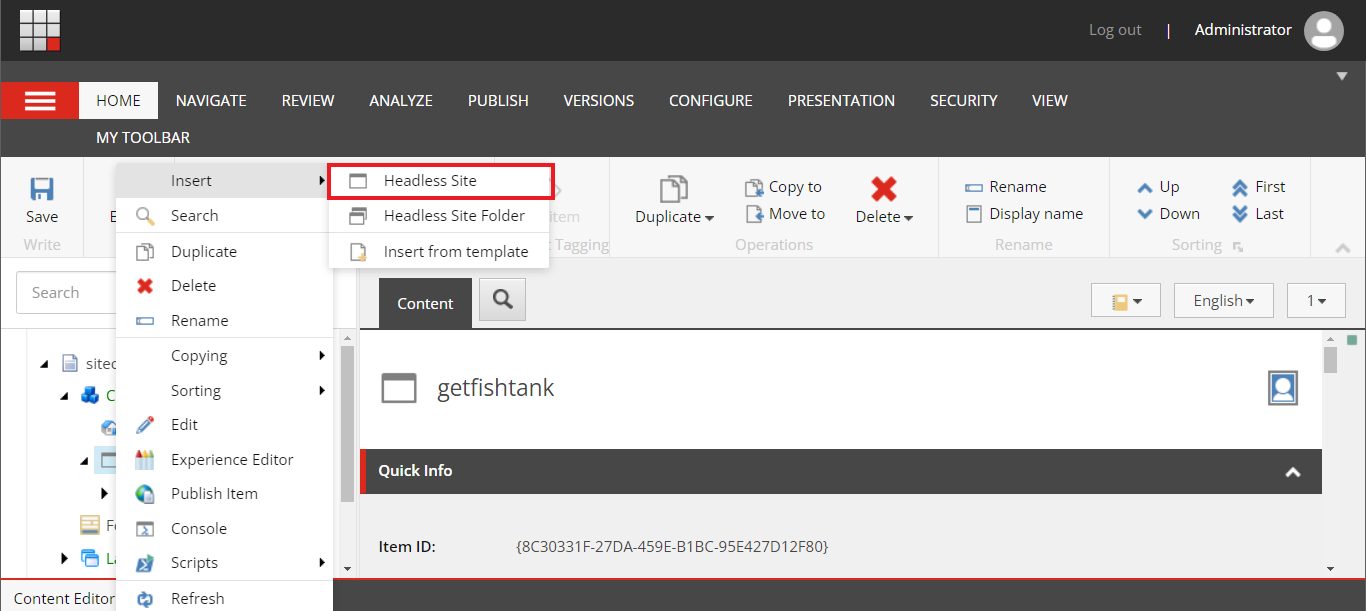
- Right-click on Sitecore\content\BizTechDemo and select Insert/Headless Site.
- General tab: Our site name is BiztechnosysCms.
- Modules tab: Select all the modules.
- Site Settings tab: The GraphQL endpoint can stay as default, and the deployment secret can be blank (we will get to that later).
Configuring the Rendering Host for SXA
Sitecore needs to know where our Next.js front end is located. This allows Sitecore to essentially proxy the site into Experience Editor and Preview modes to create a seamless and impressive experience.
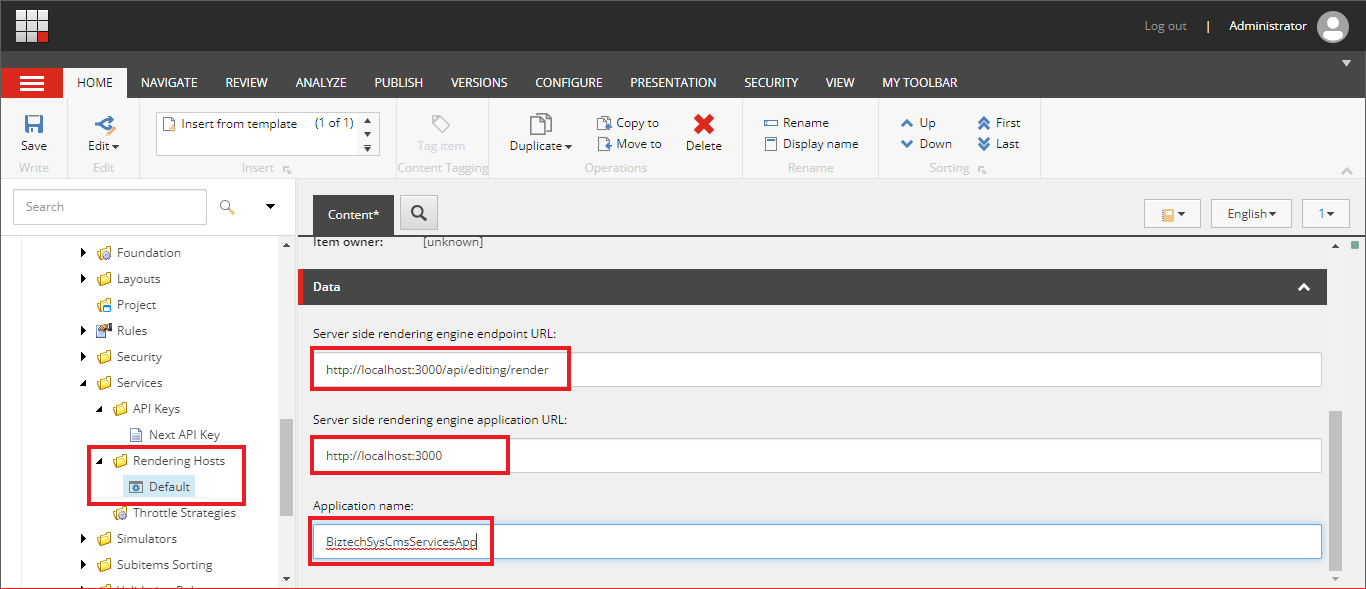
Your SXA site will by default point to this /sitecore/system/Settings/Services/Rendering Hosts/Default as its rendering host. The values should be as follows:
- Rendering Engine Endpoint URL: http://localhost:3000/api/editing/render
- Rendering Engine Application URL: http://localhost:3000
- Application Name: BiztechSysCmsServicesApp (of course, change if appropriate)
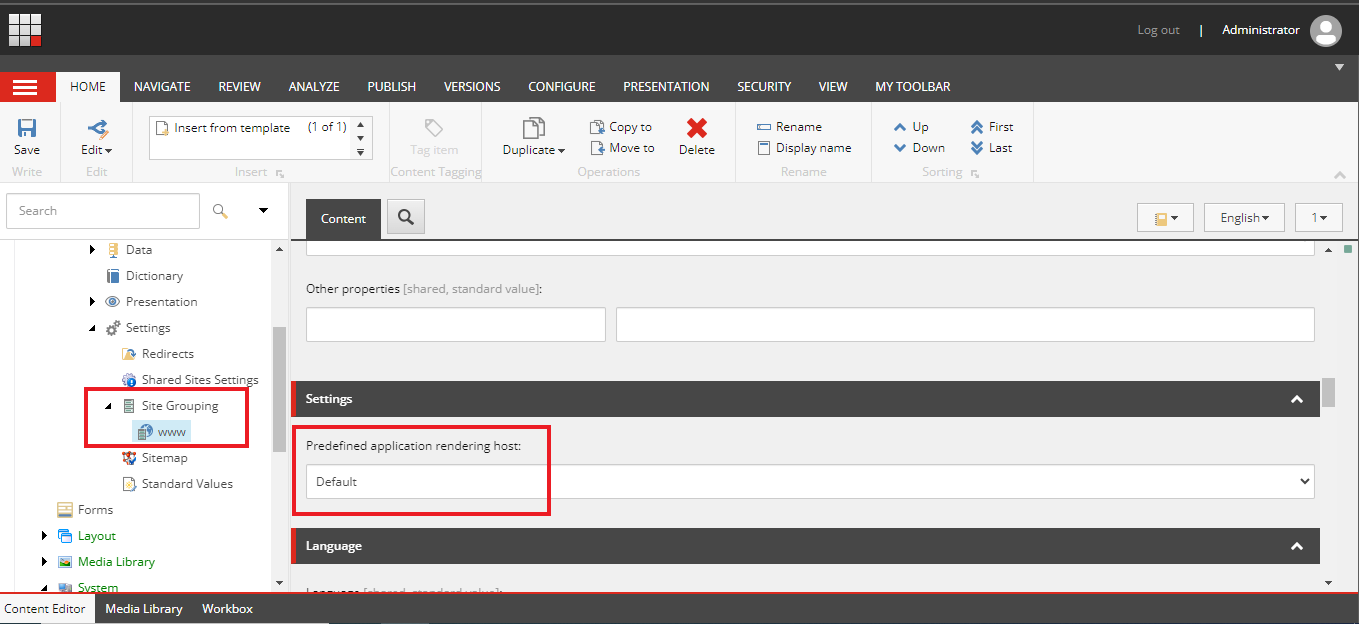
To see how this connects to your SXA site, you can see and change the selected rendering host at /sitecore/content/BizTechDemo/BiztechnosysCms/Settings/SiteGrouping/ BiztechnosysCms under the Settings and Predefined application rendering host.
Creating a JSS API Key
A quick bit of setup to create an API Key to communicate with Sitecore You can have multiple API Keys with different setups; we will setup a very plain one here for development.
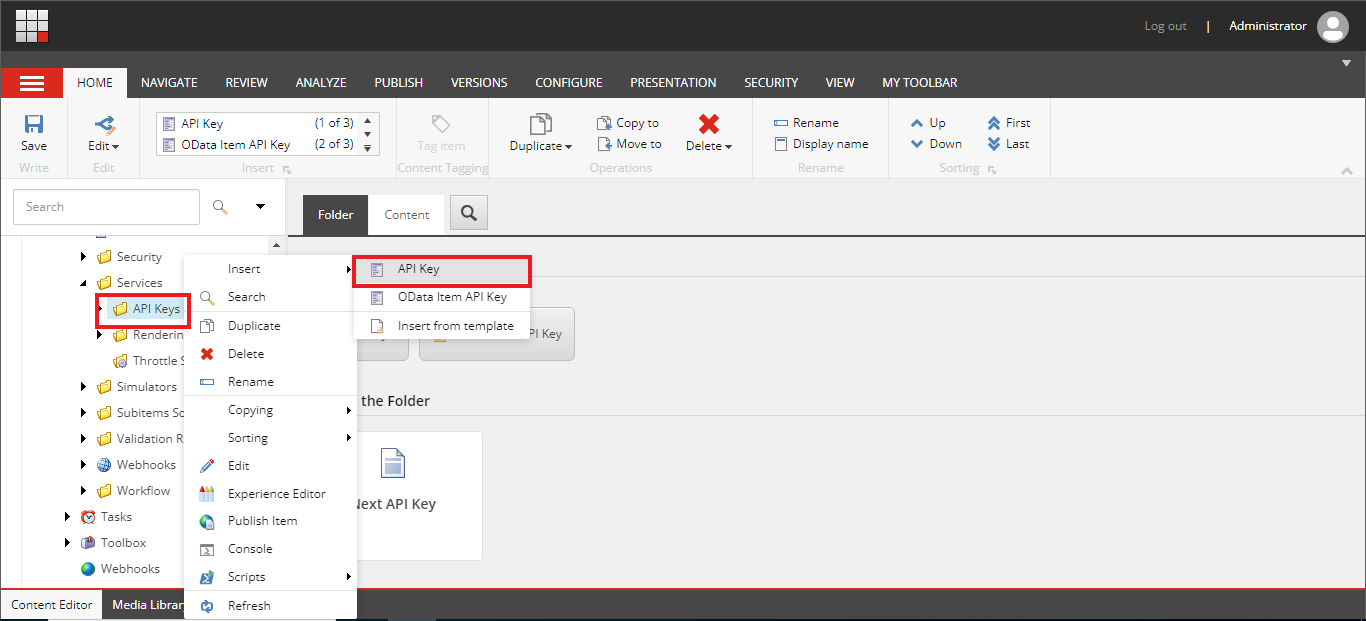
Navigate to /sitecore/system/Settings/Services/API Keys, right-click, and insert an API Key item. The name is only informational; name it, as you like.
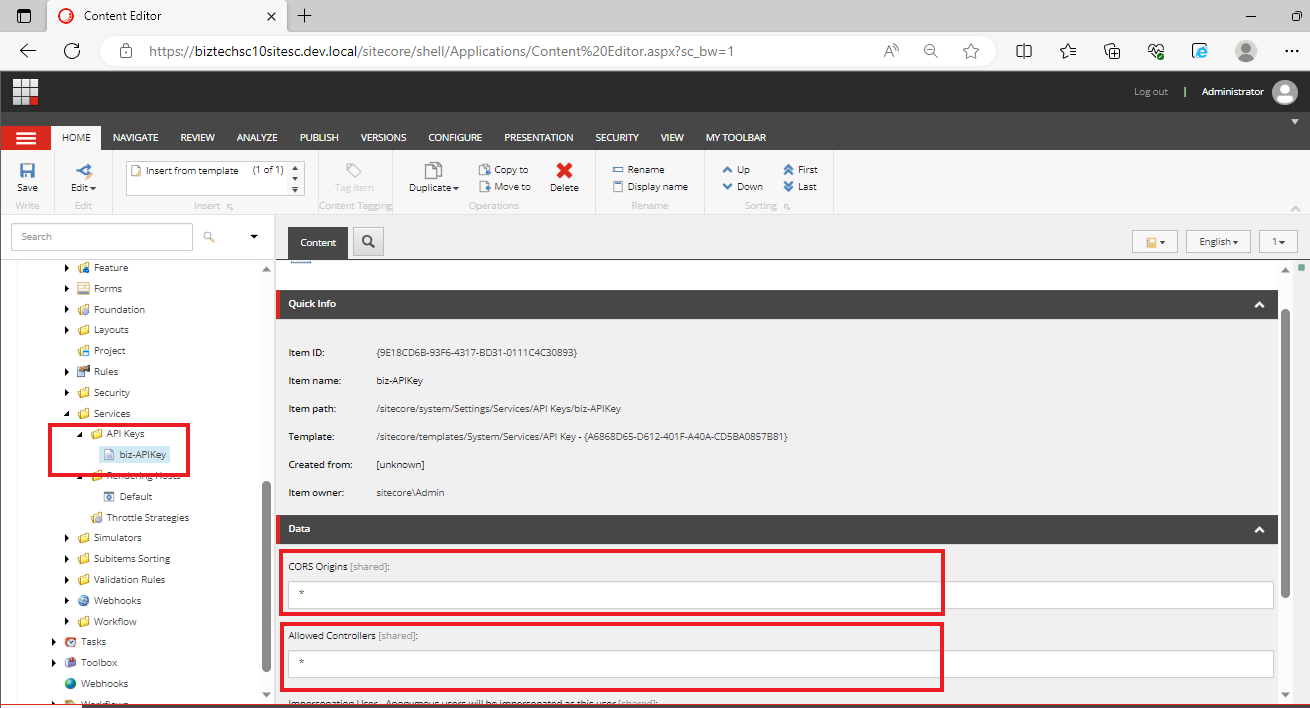
We will set CORS Origin: * and Allowed Controllers: * to leave it open as we are in development.
He has no need for a throttle Strategy (see the item below) or Impersonation.
This API Key value is important.
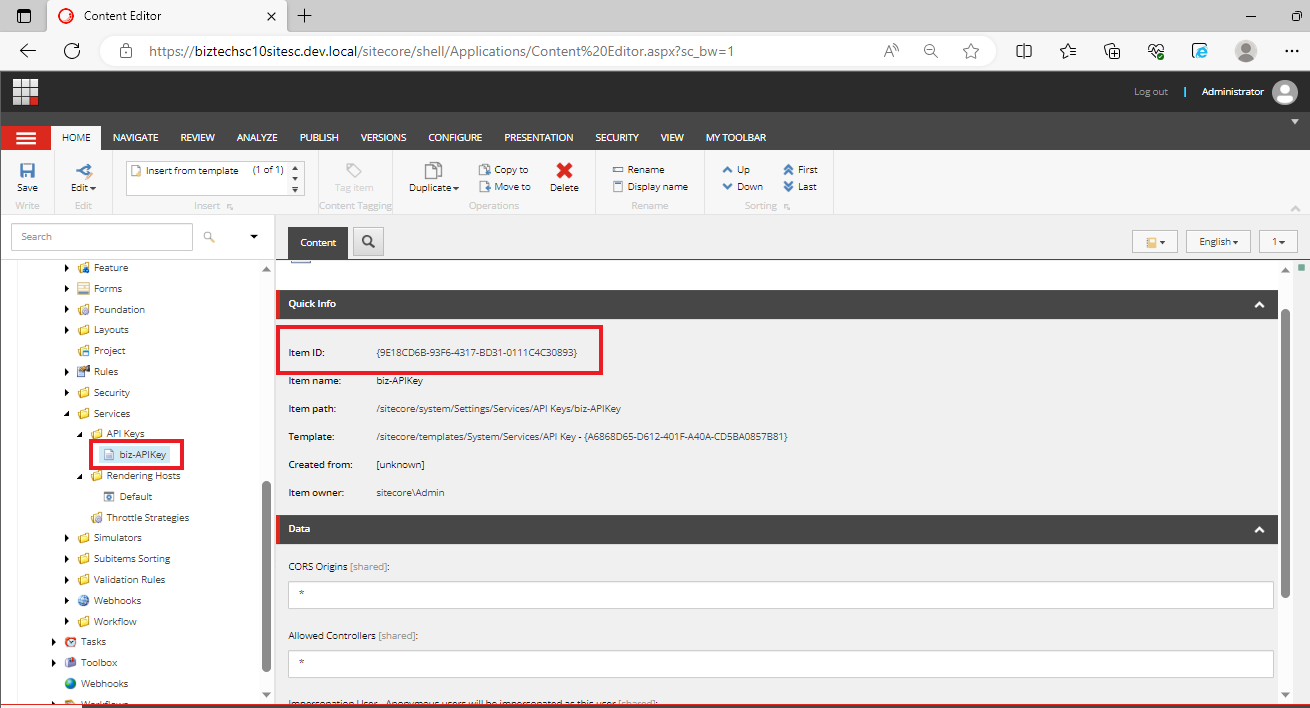
Grab the Item ID of the API Key. Save it. Copy it to Notepad.
We will need it for the JSS setup steps soon.
Save and publish the item.
When we use the API Key in the setup, we will drop the curly brackets but keep the dashes.
Setting up JSS
You will need the latest (or very recent) version of Node installed for this to work. Download Node.js (https://nodejs.org/en/download).
We are working out D:\BiztechnosysHeadlessSite\ and will create the folder BiztechnosysHeadlessSite as the base of our overall install. Move into that folder.
Open the CMD in Run as Administrator and move to your path, e.g., – D:\BiztechnosysHeadlessSite.
Install Sitecore JSS CLI
Now Run npm install @sitecore-jss/sitecore-jss-cli -g to install the latest CLI for Sitecore.
You can try to install this package globally, but later we will run a jss setup command, which will prompt us for a non-global install.
Run jss –help to verify the setup.
Create Your Next.js Project
Now run below command for creating Next.js project.
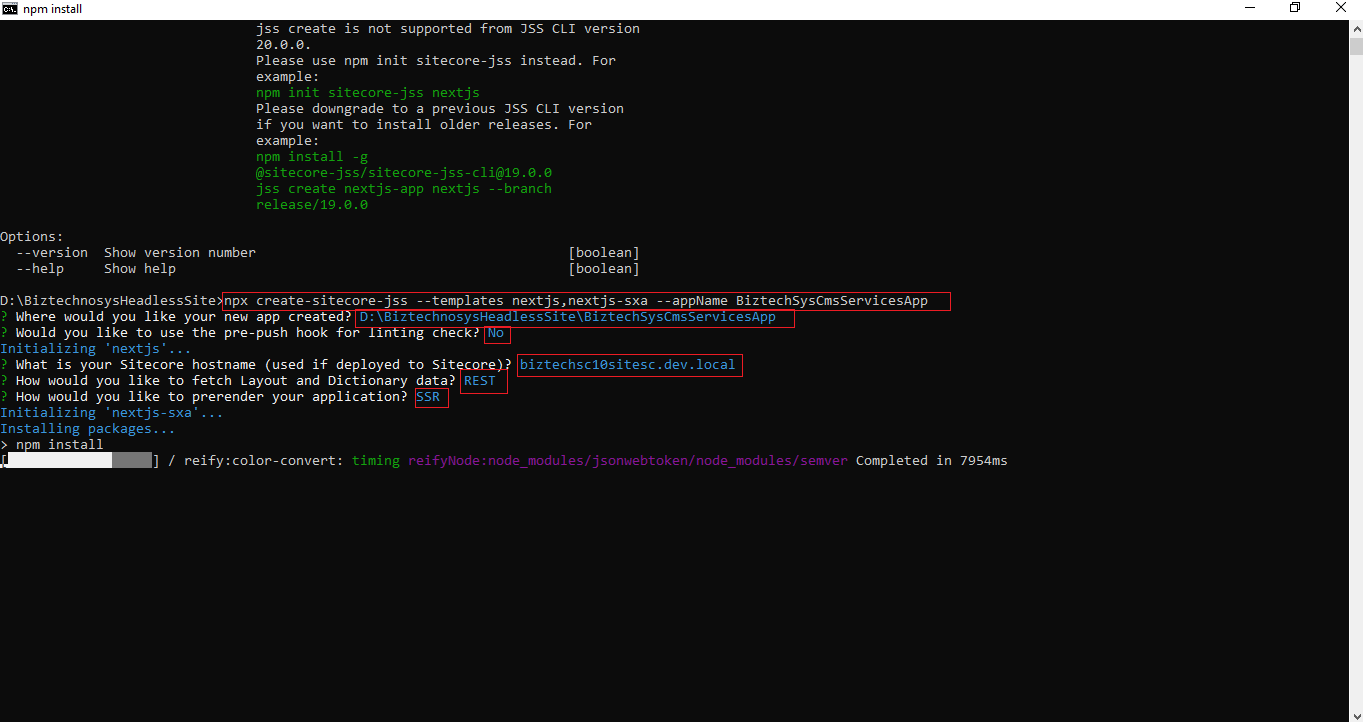
npx create-sitecore-jss –templates nextjs,nextjs-sxa –appName BiztechSysCmsServicesApp
When asked for the application location, we will leave it blank.
When asked how to pre-render our application, select SSR for static site generation.
Note that we are asking you to build an app using the nextjs and nextjs-sxa app templates. Nextjs-sxa will install the code to run the OOTB Headless SXA components we installed earlier.
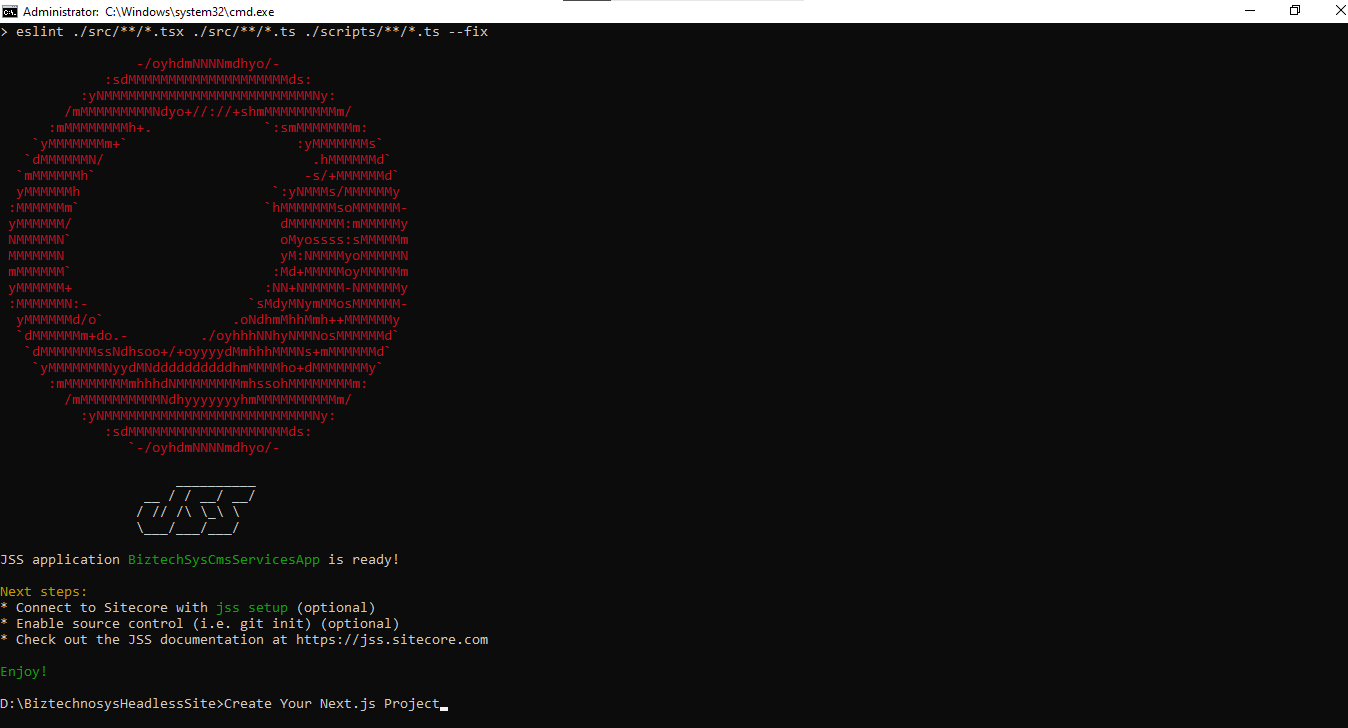
The output should look like this:
Connecting Our Next.js App to Sitecore
First thing, let’s navigate up into our newly created Next.js application folder. This is important because, with the app now created, this will be our new base for commands.
Here is how we answer the questions: Please note that the hostname, folder, and especially the API Key could have unique values.
- Accessible via network share: Y
- Path to the Sitecore folder: C:\inetpub\wwwroot\biztechsc10sitesc.dev.local
- Sitecore hostname: https:// biztechsc10sitesc.dev.local (URL, not hostname)
- Sitecore import service URL: [Leave blank]
- Sitecore API Key: 9E18CD6B-93F6-4317-BD31-0111C4C30893 (Use your Item ID here from the previous API Key step.)
- Deployment secret: [Leave blank to auto-generate]
Note that for the API Key, we keep the dashes but remove the curly brackets.
In addition, look at the file .\sitecore\config\ BiztechSysCmsServicesApp.deploysecret.config that was created and that will be copied into our Sitecore website configs when we eventually run the JSS deploy config.
Almost there. The next step is to clean up some of the standard configs and make sure they will work for Headless SXA.
Final Configuration Updates in Next js and Sitecore
For our final bit of configuration, we are going to do the following:
- Setup the JSS Editing Secret
- Remove the site definition from the Next.js config file (SXA creates the site definition).
- Update the app definition to point to the SXA site root.
- Add our rootItemId to the DictionaryServiceFactory code.
- Update the site name in Sitecore to match the app name.
Setup JSS Editing Secret
We have two places we need to config the JSS Editing Secret. It is used to “secure the Sitecore editor endpoint exposed by your Next.js app”.
Updating the App
Open the .env file in your Next.js app root.
Find the JSS_EDITING_SECRET= and create and add a long alphanumeric value. (I used my API Key GUID with brackets and dashes removed.)
In addition, in the next line, add this line: NODE_TLS_REJECT_UNAUTHORIZED=0. For node certificate issues.
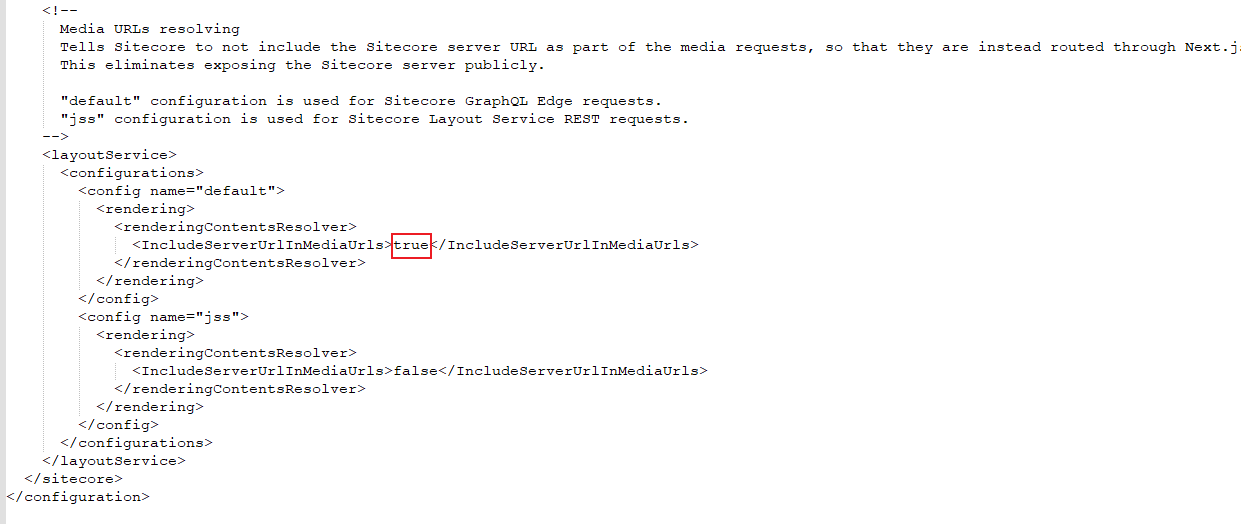
Media URLs resolving
Sitecore is not to include the Sitecore server URL as part of the media requests.
For media files, we have to change the configuration as mentioned below. Near line no 148.
Updating the Sitecore Patch Config
Now we will set this same value as 9E18CD6B93F64317BD310111C4C30893 as the JSS Editing Secret in our Sitecore patch file (that will be pushed by the jss deploy config).
Around line 41 of .\sitecore\config\BiztechSysCmsServicesApp.config updates the JavaScriptServices.ViewEngine.Http.JssEditingSecret setting.
Be aware that you will need to uncomment this setting.
Please note that in my testing experience, I needed to restart IIS to get this config patched in as no DLLs were deployed and the config was net-new. The file containing an empty secret that should be patched is at \App_Config\Sitecore\JavaScriptServices\Sitecore.JavaScriptServices.ViewEngine.Http.config.
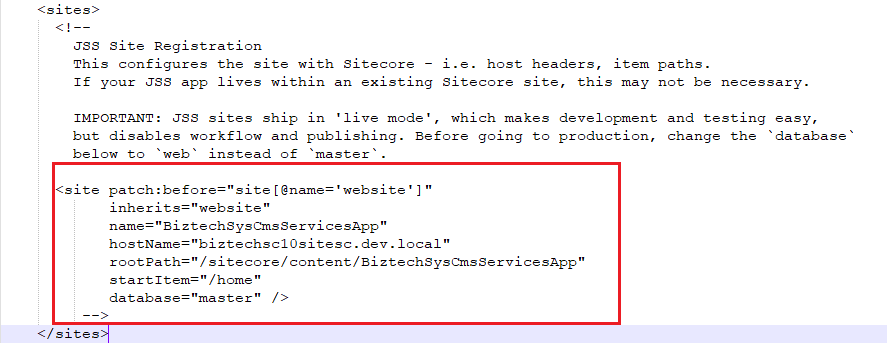
Remove the hardcoded site definition.
Around line 65 of .\sitecore\config\BiztechSysCmsServicesApp.config, comment out the OOTB, site definition. SXA configuration items within Sitecore manage this, so it is not needed.
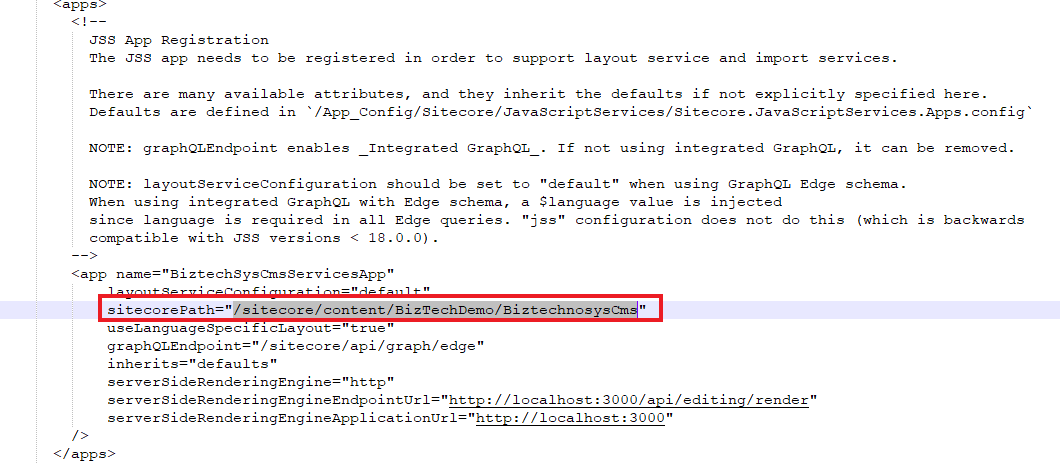
Update App’s SitecorePath Definition
Near line 92, update the SitecorePath in the app definition of the website’s root item: /sitecore/content/BizTechDemo/BiztechnosysCms.
Add RootItemId to the DictionaryServiceFactory
Open the file .\src\lib\dictionary-service-factory.ts and look at around line 19. We will add the property rootItemId: {home-item-guid}.
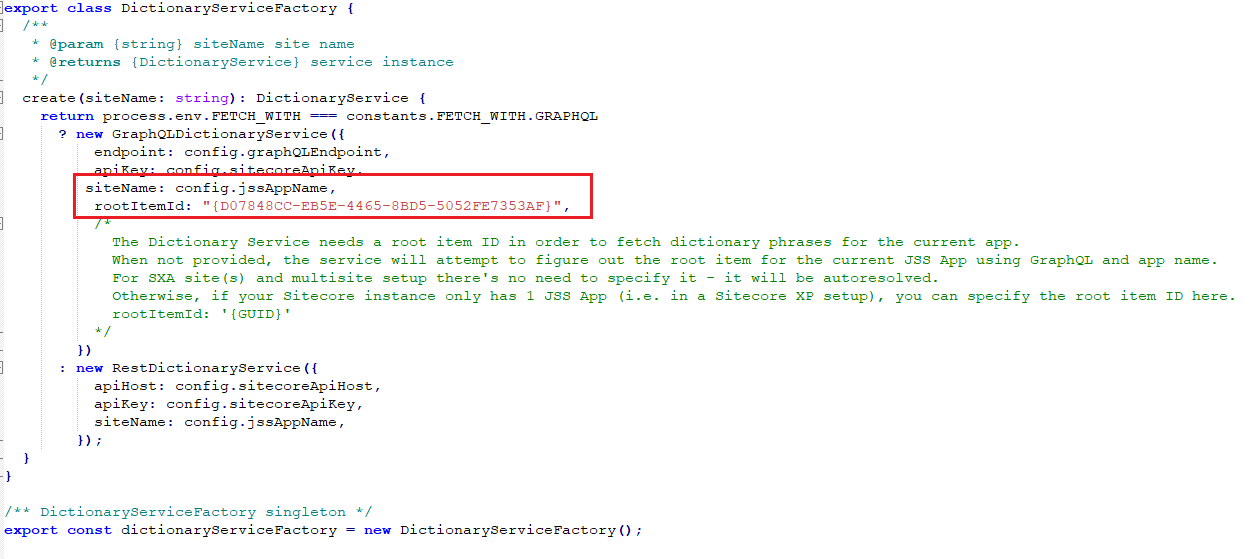
The rootItemId is the item ID of the Home item at /sitecore/content/BizTechDemo/ BiztechnosysCms/Home. On the home page of your SXA site, there is a handy comment in the file as well.
Update the Site Name to Match the App Name
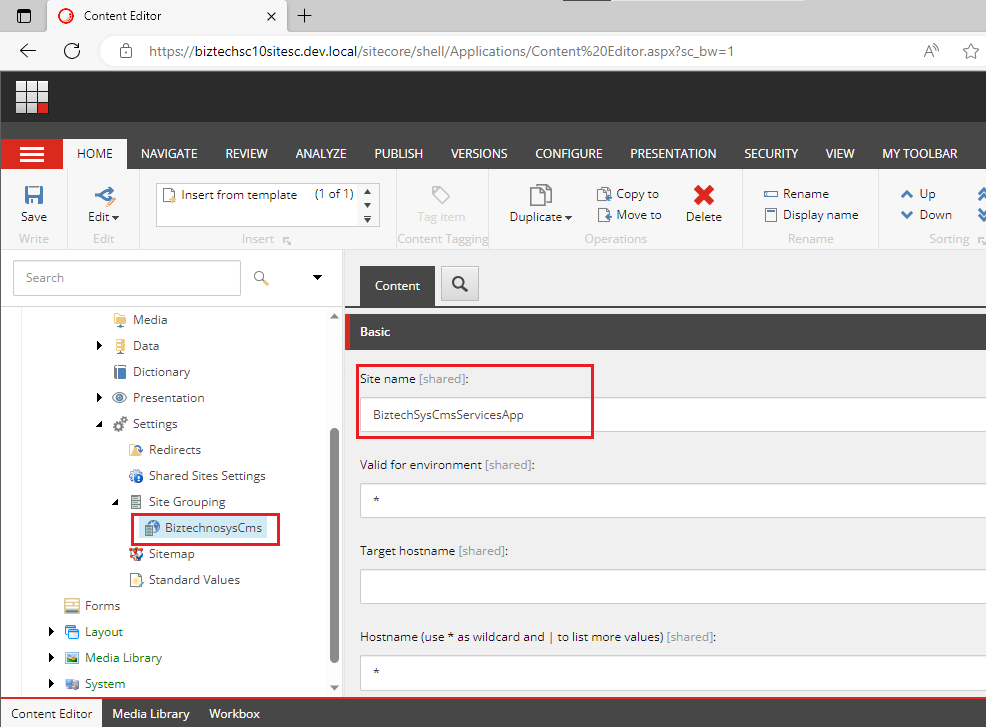
The site name is used in requests to Sitecore to resolve the headless content. The app name and the name attribute of the site definition in SXA must be made to match.
In the content editor, navigate to /sitecore/content/BizTechDemo/BiztechnosysCms /Settings/Site Grouping/BiztechnosysCms.
Finally, your website is starting!
Now that we have done all this setup, we will deploy the config files in the./sitecore/config folder.
Run: jss deploy config
Note: Restart your IIS to be safe. I have found that new configs did always trigger an IIS restart. For example, when I checked ShowConfig.aspx, I did not see my JSS Editing Secret until after a restart.
Then start our Next.js site in connected mode.
Run: jss start:connected
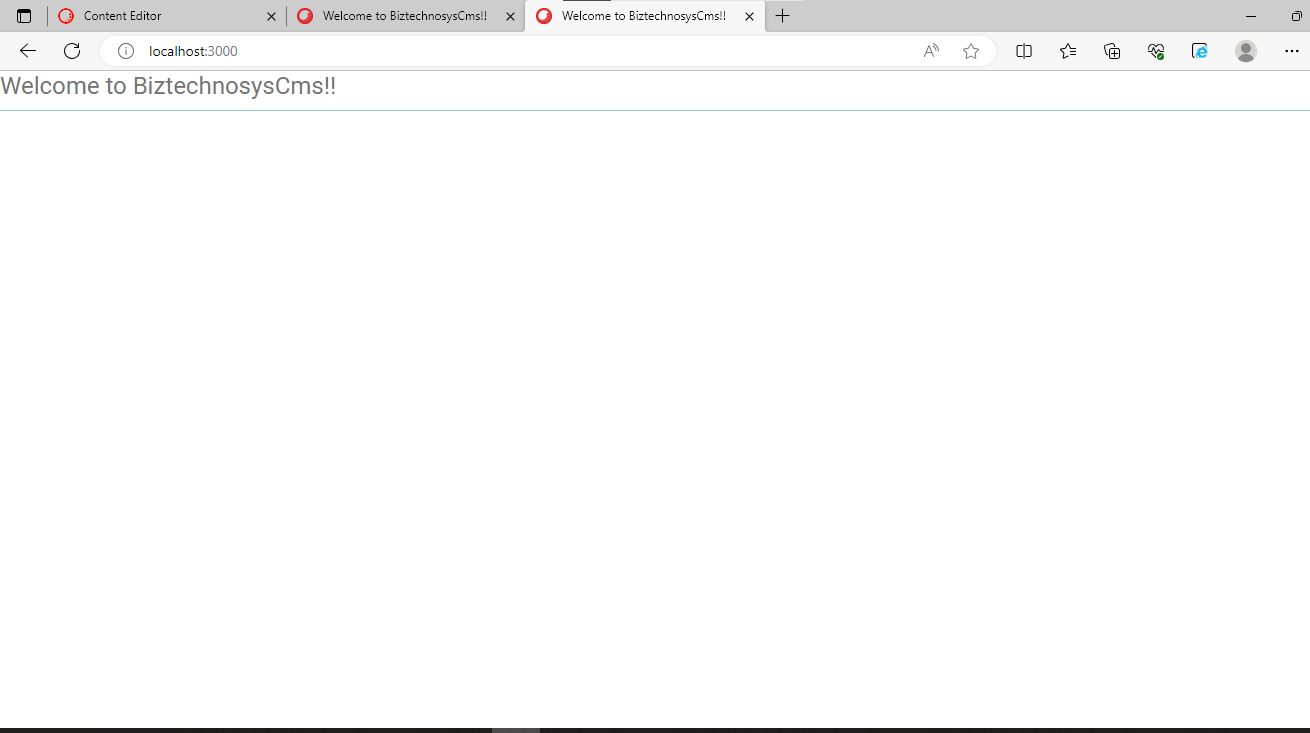
Load http://localhost:3000 to see it in action!
Now that you probably have not added anything to your home page, it will be blank. However, the page title in the browser should have a value like BiztechnosysCms.
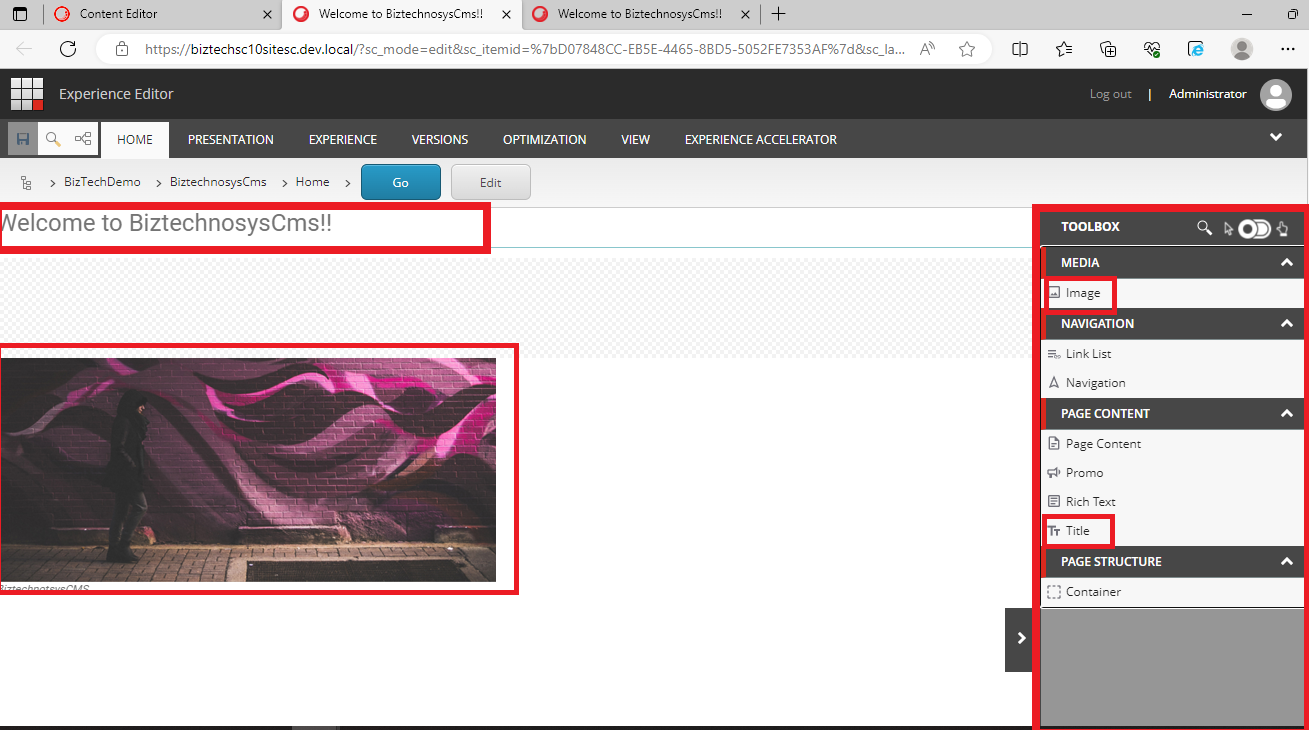
Check Experience Editor
Go back into Sitecore, navigate to your home item at /sitecore/content/BizTechDemo/ BiztechnosysCms/home, right-click the item, and select Experience Editor.
Conclusion
Congratulations! You have successfully installed Sitecore Headless and set up a JSS app. This powerful combination allows you to deliver engaging and personalized user experiences across various channels while benefiting from Sitecore’s robust backend capabilities.
Remember that this blog post provides a basic overview of the installation process. As you delve deeper into Sitecore Headless and JSS, you will discover more advanced features and customization options to elevate your web development projects.
Happy coding and exploring the world of headless architecture with Sitecore and JSS!


